Pam Winters Studio

Creative Design and Illustration

  • Projects
    • Graphic Design
      • Business and Promotional
      • Special Event
      • Wedding
    • Illustration
    • Invitations
      • Wedding
      • Bat Mitzvah
      • Bar Mitzvah
    • Workshops
  • Journal
  • About
    • Meet Pam
    • Client Testimonials
    • Creative Process
  • Contact
  • Shop

Custom Invitation and Garland: Peach Birthday Party

By Pam Winters

Custom Invitation and Garland: Peach Birthday Party

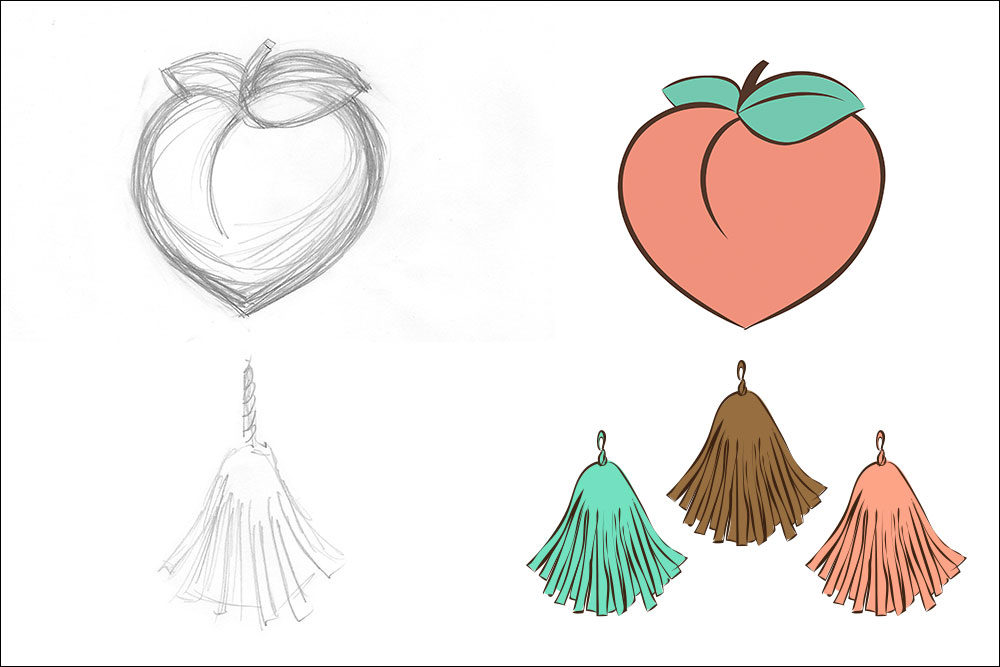
Pencil sketches and digital illustrations of a peach and tassels for the custom birthday party invitation. (All images © 2016 by Pam Winters)

Custom Invitation and Garland: Peach Birthday Party

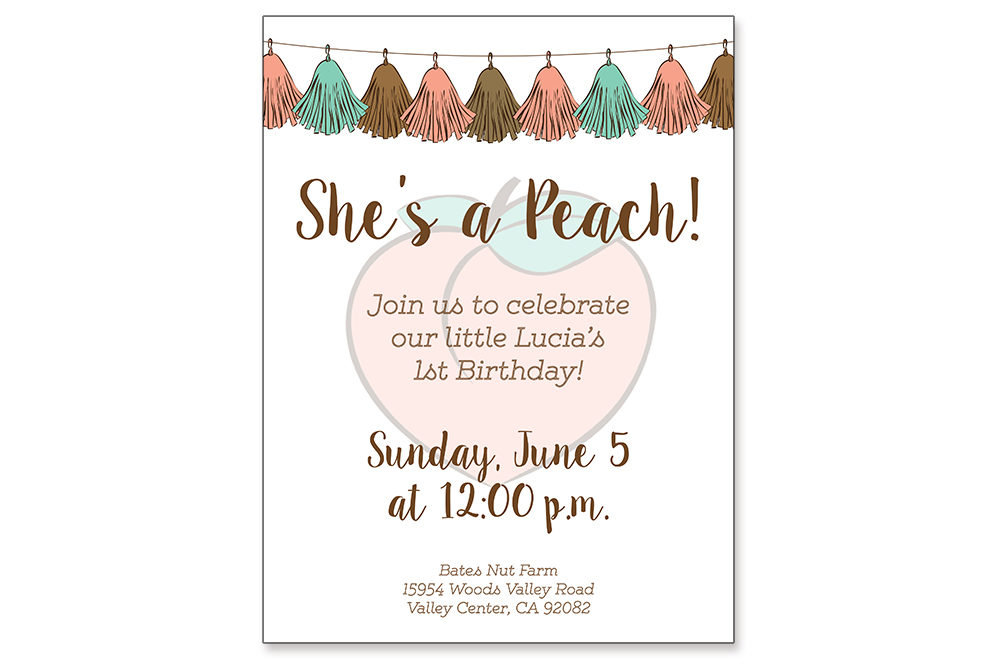
A digital custom birthday party invitation featuring original illustrations. (All images © 2016 by Pam Winters)

Custom Invitation and Garland: Peach Birthday Party

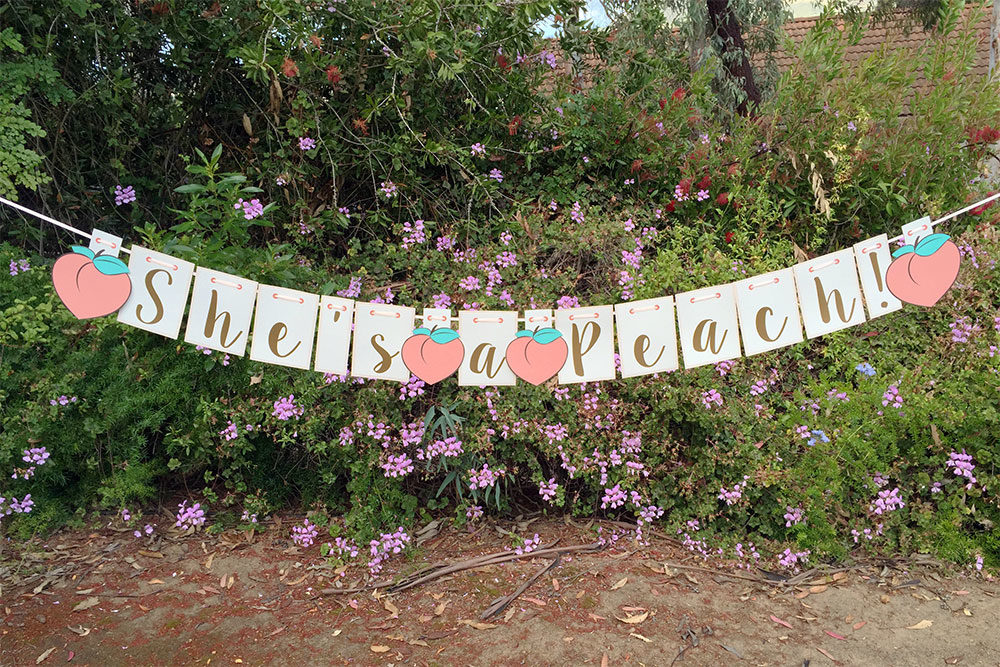
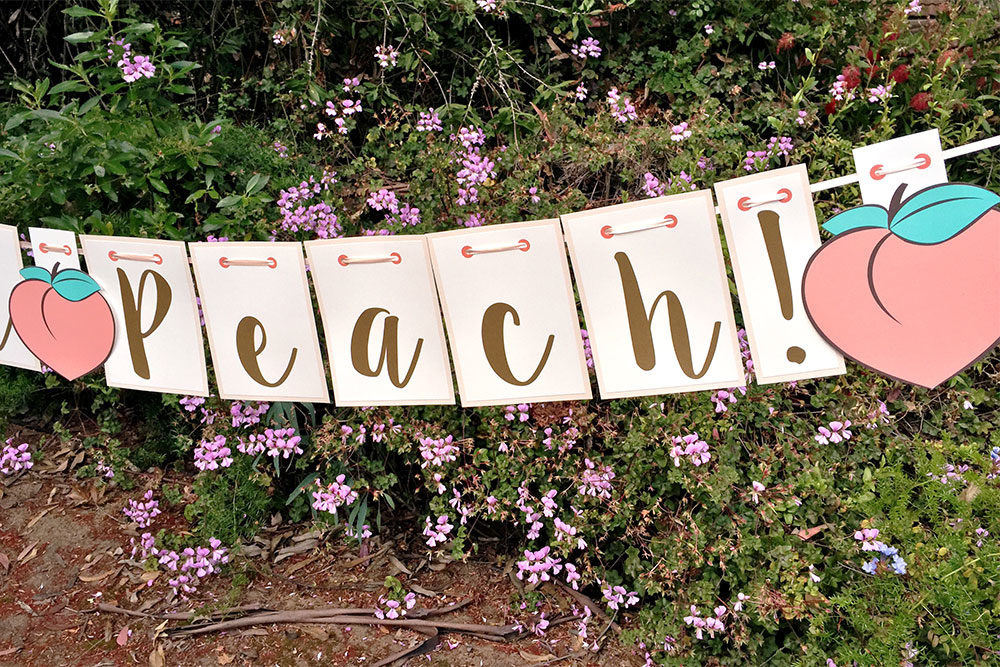
The finished custom birthday garland spelled out “She’s a Peach!” (All images © 2016 by Pam Winters)

Custom Invitation and Garland: Peach Birthday Party

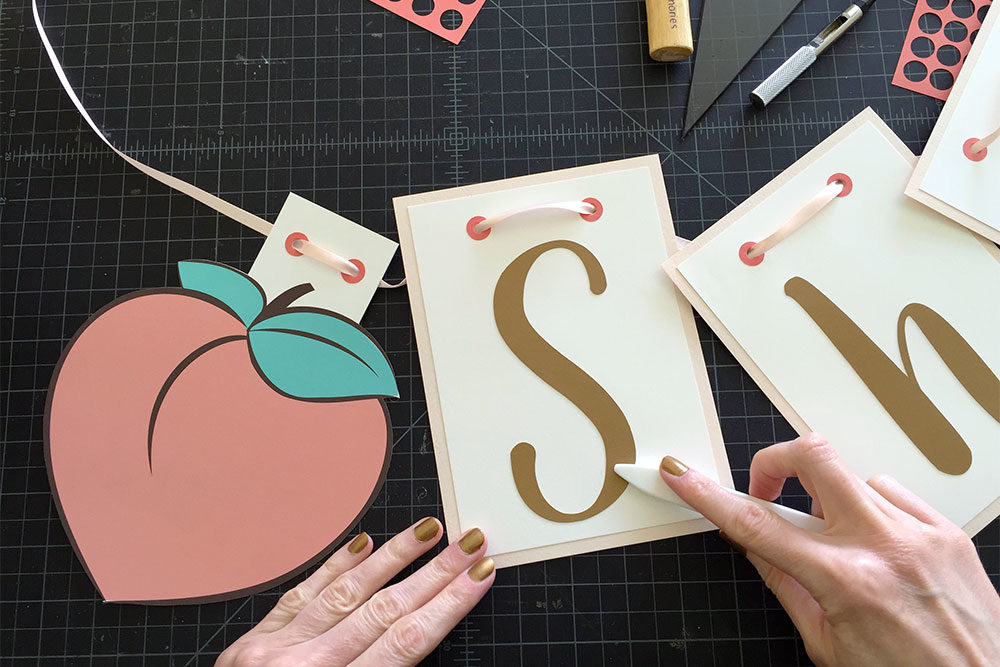
Each letter was cut out and assembled by hand before being strung on satin ribbon to spell out “She’s a Peach!” (All images © 2016 by Pam Winters)

Custom Invitation and Garland: Peach Birthday Party

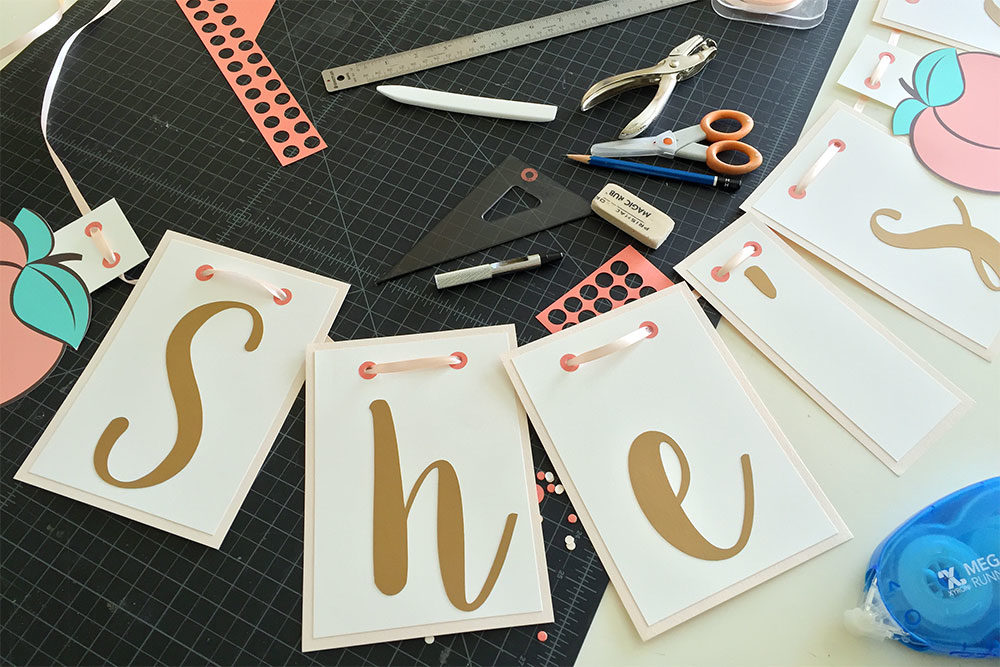
Paper letters and peach art strung on satin ribbon for the custom garland. (All images © 2016 by Pam Winters)

Custom Invitation and Garland: Peach Birthday Party

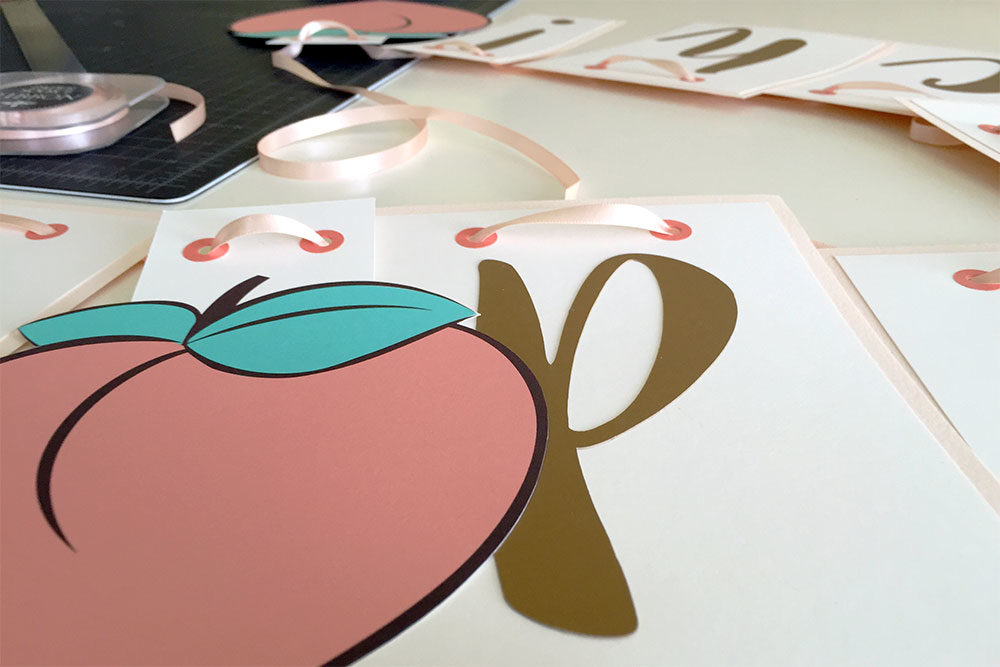
Close-up of paper letter and peach art strung on satin ribbon for the custom garland. (All images © 2016 by Pam Winters)

Custom Invitation and Garland: Peach Birthday Party

Paper letters and peach art hang on a satin ribbon for the custom birthday garland. (All images © 2016 by Pam Winters)

Custom Invitation and Garland: Peach Birthday Party

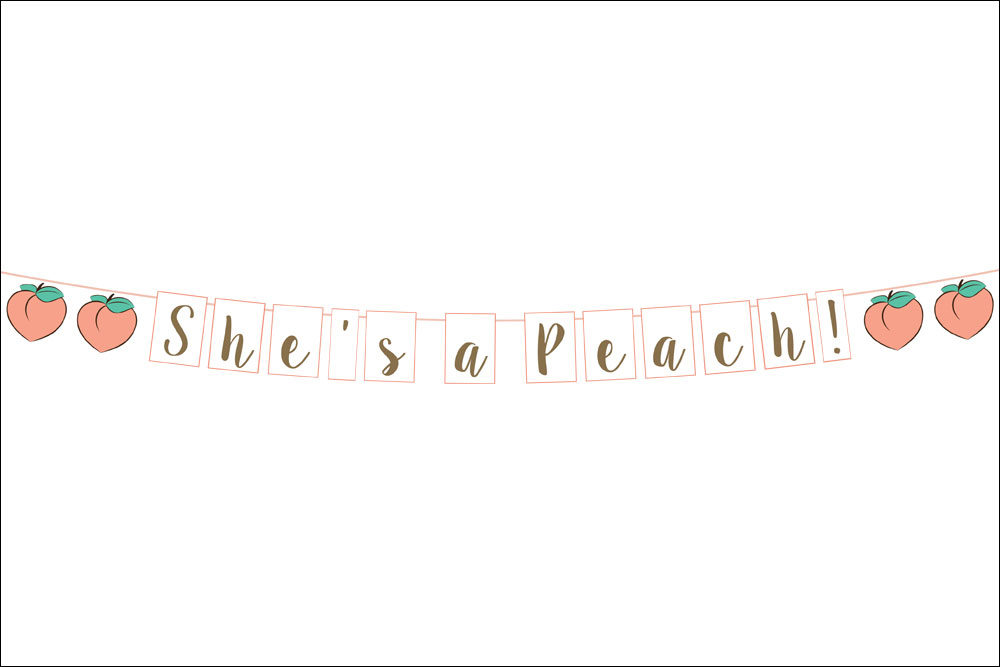
A digital mock-up I created before assembling the handmade custom garland. (All images © 2016 by Pam Winters)

Custom Invitation and Garland for a Sweet Birthday Girl

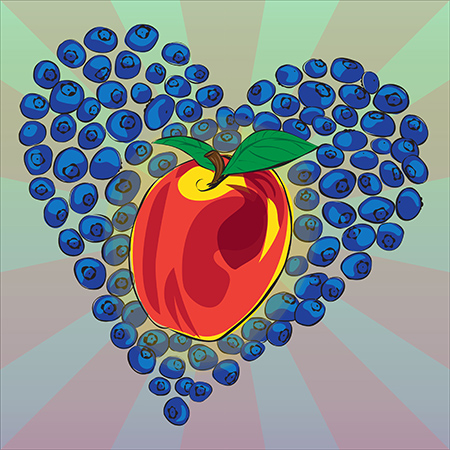
Projects where I get to draw original illustrations are some of my very favorite, and this one for a custom invitation and garland is no exception! One of my previous clients, the mother of a sweet little girl nearing her first birthday, contacted me for custom invitation and garland designs centered on a peach theme. Being a fan of tassels and peach hues, Angie brought me her inspiration and ideas for Lucia’s birthday party and we met to discuss them and the items she wanted me to make. Custom illustrations of a peach and tassels were the first things I did, and were placed front and center on the digital invitation design sent out to the birthday party guests. Then I got to work on the handmade garland, which was to spell out “She’s a Peach!” and incorporate the colors and font Angie had chosen. I also made sure to work in a highlight of the custom invitation: my peach illustration.

I printed the peach illustration at a couple of different sizes and also cut out each individual peach by hand. Additionally, I used a Silhouette CAMEO to cut the letters out from gold shimmer paper and then I mounted each letter onto two layers of card stock paper sized and arranged to show a slight border when I adhered them together using my favorite tape runner, the Xyron Mega Runner. I then glued two paper circles at the top of each garland piece (for reinforcement where ribbon would be strung through) and punched holes in the center of each circle by hand using a special tool. Satin ribbon matching one of the card stock papers, in a light peach color, was carefully strung through the punched holes and the garland was complete.

At Lucia’s birthday party, the handmade custom garland served as a festive and decorative centerpiece above the dessert table, celebrating the guest of honor and welcoming family and friends to a very joyous and special event!

Filed Under: Creative Projects Pam Winters Studio, Illustration Projects Pam Winters Studio, Uncategorized Tagged With: birthday, custom, decoration, decorations, garland, garlands, handmade, party, peach, project, projects, Special Event, Special Events, tassel, tassels

Workshop: Stamp Carving

By Pam Winters

Workshop: Stamp Carving

Everyone at the workshop received one of my handmade “starter kits.” (Photo by me, © 2016 by Pam Winters)

Workshop: Stamp Carving

The workshop gets underway! (Photos by Stacey Winters Photography, © 2016 by Pam Winters)

Workshop: Stamp Carving

Isabella transfers her sketch to the stamp block with a bone folder. (Photos by Stacey Winters Photography, © 2016 by Pam Winters)

Workshop: Stamp Carving

Donna prepares to start carving her first stamp: a tree silhouette. (Photos by Stacey Winters Photography, © 2016 by Pam Winters)

Workshop: Stamp Carving

Linda carves along the outside of her reindeer image. (Photos by Stacey Winters Photography, © 2016 by Pam Winters)

Workshop: Stamp Carving

Padie and Linda stay focused as they carve their stamps. (Photos by Stacey Winters Photography, © 2016 by Pam Winters)

Workshop: Stamp Carving

Shannon and Donna are getting off to a great start. (Photos by Stacey Winters Photography, © 2016 by Pam Winters)

Workshop: Stamp Carving

Creativity in progress! (Photos by Stacey Winters Photography, © 2016 by Pam Winters)

Workshop: Stamp Carving

Stamping and making cards! (Photos by Stacey Winters Photography, © 2016 by Pam Winters)

Workshop: Stamp Carving

Shannon’s first card looks festive in red and gold. (Photos by Stacey Winters Photography, © 2016 by Pam Winters)

Workshop: Stamp Carving

Isabella starts carving her second stamp: the word “love.” (Photos by Stacey Winters Photography, © 2016 by Pam Winters)

Workshop: Stamp Carving

Dawn’s snowman stamp is coming along nicely. (Photos by Stacey Winters Photography, © 2016 by Pam Winters)

Workshop: Stamp Carving

Dawn plans to make holiday gift tags with her snowman stamp! (Photos by Stacey Winters Photography, © 2016 by Pam Winters)

Last year, I made a goal for myself: offer an independent creative workshop for a small group of willing participants. I would not only teach and provide supplies, but also, create a fun, inspiring event in which everyone there could be creative and social while making something new that they could take home, share and enjoy. Being a creative person and having solid workshop teaching experience under my belt, I felt ready to take this next step to offer my very own workshop on something I love to do: stamp carving. The idea was great, but I soon realized that creating interest in and promoting a unique workshop experience is a more challenging task than one might think. The initial effort, while it taught me valuable things about booking a venue, marketing a workshop (in person and online) and finding resources for promotion, it did not result in enough sign-ups to run the event. Disappointed, I brainstormed with those I trust, and came to the conclusion that it was an even better idea to host a workshop closer to home, with people who already know and support me. So, that is exactly what I did. I am very fortunate to be a part of a wonderful network of family and friends, and the workshop I envisioned came to be last year because of a special group of ladies who love getting together and doing creative projects; they were excited to try their hand at carving stamps. We all had such a great time together! In order to keep the creativity flowing this year, I plan to offer more workshops in the near future. I hope to see some of you there!

Filed Under: Creative Journal Pam Winters Studio, Creative Workshops Pam Winters Studio, Uncategorized Tagged With: art, blog, creativity, design, journal, projects, social, stamp carving, workshop, workshops

Graphic Design: Easter Event at the Red Door

By Pam Winters

Graphic Design: Easter Event at the Red Door

Custom signage I designed for the Red Door’s egg dyeing party. (Event photos by Stacey Winters Photography; All images © 2016 by Pam Winters)

Graphic Design: Easter Event at the Red Door

Custom signage I designed for the Red Door’s egg dyeing party. (Event photos by Stacey Winters Photography; All images © 2016 by Pam Winters)

Graphic Design: Easter Event at the Red Door

Custom flyer I designed for the Red Door’s egg dyeing party. (Event photos by Stacey Winters Photography; All images © 2016 by Pam Winters)

Graphic Design: Easter Event at the Red Door

Custom signage I designed for the Red Door’s egg dyeing party. (Event photos by Stacey Winters Photography; All images © 2016 by Pam Winters)

Graphic Design: Easter Event at the Red Door

Custom signage I designed for the Red Door’s egg dyeing party. (Event photos by Stacey Winters Photography; All images © 2016 by Pam Winters)

Graphic Design: Easter Event at the Red Door

The front of the custom save the date postcard I designed for the Red Door’s egg dyeing party. (All images © 2016 by Pam Winters)

Graphic Design: Easter Event at the Red Door

The back of the custom save the date postcard I designed for the Red Door’s egg dyeing party. (All images © 2016 by Pam Winters)

Graphic Design: Easter Event at the Red Door

Custom flyer I designed for the Red Door’s egg dyeing party. (Event photos by Stacey Winters Photography; All images © 2016 by Pam Winters)

Graphic Design: Easter Event at the Red Door

Custom signage I designed for the Red Door’s egg dyeing party. (All images © 2016 by Pam Winters)

Graphic Design: Easter Event at the Red Door

Custom signage I designed for the Red Door’s egg dyeing party. (All images © 2016 by Pam Winters)

Graphic Design: Easter Event at the Red Door

Custom signage I designed for the Red Door’s egg dyeing party. (All images © 2016 by Pam Winters)

Ads and Signage for a Festive Easter Event

The project pictured here was done for a special seasonal event at the Red Door, located in the Mission Hills neighborhood of San Diego. The Red Door is known for its original seasonal menus based on fresh, local, organic and sustainable ingredients, as well as for offering a unique “casual fine dining” experience. This particular event was to be an all-natural Easter egg dyeing party for children, held at the restaurant and hosted by the Red Door’s chef, Karrie Hills. I met with Kelsey Doonan, the event coordinator, who gave me a rundown on event details, including the specific printed pieces needed. I was excited to start work on these promotional and event signage pieces, which were to coincide with the look and feel of the restaurant’s branding, but also bring to mind the playful fun of spring and egg dyeing, through colorful touches of pastels and watercolor effects.

Kelsey followed up with several digital inspiration boards full of spring party ideas, which helped steer me in the right direction, so that I could quickly create and find the perfect design elements to bring together. Most of the work was done on the computer, including digital brushes I used to create the watercolor effects on the signs. The final pieces were utilized in both print and digital format (e.g., for advertising the event at the restaurant, as well as online). The Red Door has a phenomenal staff, and one of the bonuses of working on this was getting to know many of the wonderful people involved in the restaurant’s day-to-day operations. I was also fortunate enough to work with my sister, Stacey, on this project, as she was brought on to be the photographer for the event; the slideshow above gives a glimpse of the beautiful job she did of capturing the day.

Read about Kelsey’s experience working with me.

Filed Under: Creative Projects Pam Winters Studio, Uncategorized Tagged With: Business, businesses, design, Easter, flyer, Graphic Design, Portfolio, projects, promotional, save the date, signage, small business, Special Event, Special Events

Graphic Design: Custom Wedding Table Numbers

By Pam Winters

Graphic Design: Custom Wedding Table Numbers

Custom table numbers (Digital mock-ups shown here; each printed card measures 5 1/2″ x 8 1/2″), © 2015 by Pam Winters

Graphic Design: Custom Wedding Table Numbers

Custom table numbers (Digital mock-ups shown here; each printed card measures 5 1/2″ x 8 1/2″), © 2015 by Pam Winters

Graphic Design: Custom Wedding Table Numbers

Custom table numbers (Digital mock-ups shown here; each printed card measures 5 1/2″ x 8 1/2″), © 2015 by Pam Winters

Graphic Design: Custom Wedding Table Numbers

Custom table numbers (Digital mock-ups shown here; each printed card measures 5 1/2″ x 8 1/2″), © 2015 by Pam Winters

Graphic Design: Custom Wedding Table Numbers

Custom table numbers (Digital mock-ups shown here; each printed card measures 5 1/2″ x 8 1/2″), © 2015 by Pam Winters

Graphic Design: Custom Wedding Table Numbers

Custom table numbers (Digital mock-ups shown here; each printed card measures 5 1/2″ x 8 1/2″), © 2015 by Pam Winters

Read about Monica and Tyler’s experience working with me.

Filed Under: Creative Projects Pam Winters Studio, Uncategorized Tagged With: design, Graphic Design, Portfolio, projects, table numbers, wedding, Wedding Graphic Design

Summertime Favorite: Blueberry Buckle

By Pam Winters

Summertime Favorite: Blueberry Buckle

Butter and sugar, mixed until light and fluffy, are the beginnings of Blueberry Buckle (Photos by Stacey Winters Photography, © 2015 by Pam Winters)

Summertime Favorite: Blueberry Buckle

Adding an egg to the butter mixture, which will become the batter (Photos by Stacey Winters Photography, © 2015 by Pam Winters)

Summertime Favorite: Blueberry Buckle

Peeling fresh orange zest with a special tool is the best way to infuse a little citrus flavor into the recipe (Photos by Stacey Winters Photography, © 2015 by Pam Winters)

Summertime Favorite: Blueberry Buckle

Mixing the dry ingredients in a separate bowl, before adding them to the wet batter ingredients (Photos by Stacey Winters Photography, © 2015 by Pam Winters)

Summertime Favorite: Blueberry Buckle

Wet and dry ingredients are gently blended together (Photos by Stacey Winters Photography, © 2015 by Pam Winters)

Summertime Favorite: Blueberry Buckle

Cutting fresh nectarines into slices, then into thirds (Photos by Stacey Winters Photography, © 2015 by Pam Winters)

Summertime Favorite: Blueberry Buckle

Getting ready to mix the nectarine slices with freshly-squeezed lemon juice (Photos by Stacey Winters Photography, © 2015 by Pam Winters)

Summertime Favorite: Blueberry Buckle

Mixing fresh fruit together, including the citrus flavoring from the lemon juice (Photos by Stacey Winters Photography, © 2015 by Pam Winters)

Summertime Favorite: Blueberry Buckle

Combined blueberries and nectarines are gently mixed into the batter bowl (Photos by Stacey Winters Photography, © 2015 by Pam Winters)

Summertime Favorite: Blueberry Buckle

A handheld pastry blender mixes the topping ingredients: flour, butter, cinnamon and sugars (Photos by Stacey Winters Photography, © 2015 by Pam Winters)

Summertime Favorite: Blueberry Buckle

Blended topping ingredients are sprinkled to cover the batter, which fills a square baking pan (Photos by Stacey Winters Photography, © 2015 by Pam Winters)

Summertime Favorite: Blueberry Buckle

The cooked dessert is removed from the oven and tested with a toothpick in the center (Photos by Stacey Winters Photography, © 2015 by Pam Winters)

Summertime Favorite: Blueberry Buckle

Just out of the oven, the dessert is set aside to cool for 15 minutes on a baking rack (Photos by Stacey Winters Photography, © 2015 by Pam Winters)

Summertime Favorite: Blueberry Buckle

Cutting the first piece (Photos by Stacey Winters Photography, © 2015 by Pam Winters)

Summertime Favorite: Blueberry Buckle

Bon appétit! (Photos by Stacey Winters Photography, © 2015 by Pam Winters)

Blueberry + Nectarine Heart Digital Illustration

During the summer of 1986, I found myself standing in a grocery store line with my mom. I remember perusing the magazines at the checkout stand, a habit I continue to have to this day. I’m sure I scanned the usual fare: TV Guide, Cosmopolitan, etc. Suddenly, a new item caught my undivided attention: Good Food Magazine. The cover displayed the headline “Star-Spangled Desserts,” placed just above a close-up shot of fresh berries mingled together in a perfect balance of red and blackish blue. I remember picking up the small booklet-sized magazine, intent on finding out what was meant by “Star-Spangled Desserts.” Whatever it was, it sounded right up my alley. The Good Food issue in my hands, I quickly turned the pages of the article in question, whereby I found not one, but an entire collection of colorful desserts. Even as a teenager, I was quite a baker, and I knew something good when I saw it. The thought came to my mind: did I hit the jackpot or what?

Well, as it turns out, there was one recipe in particular that would emerge as my true love from that article swimming with delicious summertime desserts. That recipe is Blueberry Buckle. Just the name itself was enough to close the deal. Who eats “buckle”? Sounds like fun! Looking at the article today, which contains a photo of all the desserts (yes, I saved the original cover and article pages from the magazine), I can see why I picked Blueberry Buckle as the one to make. First of all: blueberries and nectarines; need I say more? In the photo, Blueberry Buckle is cut into square pieces, which are stacked on one another, looking moist and dense—like the best kind of coffee cake—and showcasing clusters of baked fruit; each piece is adorned with a blanket of golden crumble topping. One of the best things about this recipe, besides its good looks and taste, is its versatility. Blueberry Buckle can be served warm or cold, and is equally delicious. It can be eaten for breakfast or for afternoon/evening dessert, along with coffee or tea; in the latter instance, a scoop of vanilla bean ice cream when the dessert is fresh out of the oven truly completes it.

Baking remains one of my all-time favorite culinary activities to this day. And thanks to Blueberry Buckle, I am never lacking for a summertime recipe to make for family and friends. Sadly, for the other recipes in that Good Food article, I have never had the heart–or perhaps more accurately, the willpower–to tear myself away from making Blueberry Buckle long enough to give them a try. That’s how good this recipe is, and why I continue to make it for all the special and wonderful people in my life. I love nothing more than seeing their eyes light up in anticipation of the infamous “buckle.” These moments, filled with joy, laughter and conversation, shared over a homemade treat, are a true gift. And I realize that, yet again, I’ve hit the jackpot.

Pictured above: Original digital illustration, © 2015 by Pam Winters

Click here to view the complete Blueberry Buckle recipe, as it originally appeared in Good Food Magazine. Bon appétit!

Filed Under: Creative Journal Pam Winters Studio, Uncategorized Tagged With: art, baking, blog, blueberry, blueberry buckle, cooking, creative, dessert, favorite, homemade, Illustration, journal, projects, recipe, summertime, writing

  • 1
  • 2
  • 3
  • Next Page »

Get in touch

Phone: 760-761-4933
Email: pam@pamwinters.com

Office Hours

M-F: 1-5 p.m. (PT)

Stay in the loop

Let’s connect

Back to top
Copyright © 2021 by Pam Winters